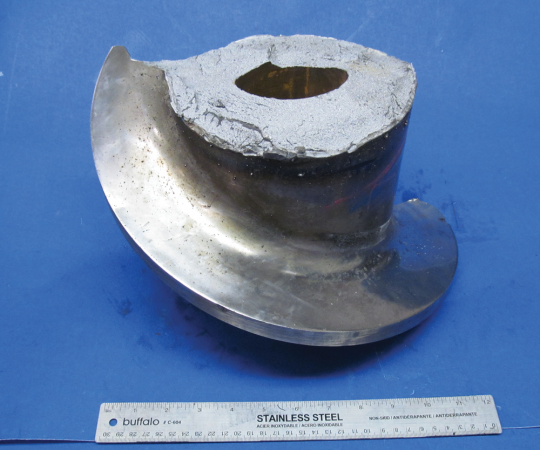
Feed screw failure
By Shane Turcott
Industry Innovation & Technology Operations Manufacturing manufacturing metallurgical metalworkingHow a metallurgical analysis solved the problem.
When a large feed screw snapped during a straightening operation and the cause was not immediately obvious, the Canadian manufacturer decided to conduct a metallurgical analysis to determine the details of the failure.
The 12.5-inch diameter, AISI 4140 forged steel screw was quenched and tempered. After rough machining, grooves were cut for the flutes, overlayed with stainless steel and then ground flat. Welding of the flutes required an 800 degree F (427 degree C) pre-heat and interpass temperature.
Stereoscopic examination found the brittle fracture had initiated from a pre-existing crack along a small circumferential weld. A scanning electron microscope (SEM) resolved the initial 0.080-inch (approximately 2-mm) region of the fracture to exhibit intergranular features typical of hot tear cracks, therefore the initial cracks had formed during welding.
The brittle fracture indicated the feed screw failed during a sudden impact-loading event while being straightened.Discussion with the manufacturer (unidentified by request) also revealed the feed screw may have been manually hammered.
A metallographic cross-section was taken adjacent the fracture initiation region and examined with an optical microscope. Numerous weld cracks were observed within the heat-affected zone (HAZ) of the circumferential weld. These hot tear cracks ranged up to 0.080 inches deep and were similar to the crack where the failure was initiated. The weld HAZ comprised of untempered martensite had a hardness ranging up to 57 HRC. This extremely hard HAZ indicated the circumferential weld had been made without the required pre-heat treatment.
The flute welds in the neighbouring region appeared to have been properly done using a reasonable pre-heat and interpass temperature. No cracks were observed.
Optical examination found the core screw material had not been quenched fast enough during heat-treating to through-harden the full wall thickness. This was evident from the core, which consisted of a mixed rather than the desired, fully martensitic structure. As a result, testing of the core material found substandard yield and ultimate tensile properties.
Although considered a quality issue worth pursuing, the substandard core tensile properties were not the primary cause of the failure. The material exhibited adequate elongation for sufficient ductility to sustain significant deformation during a gradual straightening operation, but AISI 4140 may inherently not have adequate hardenability to fully through-harden a 4.5-inch wall using a water quenchant.
The mixed microstructure may have resulted in low material toughness, making it more susceptible to brittle fracture, but this was not deemed the primary cause of failure. The material did not have a toughness requirement and the part was already compromised by the introduction of the weld cracks prior to the brittle fracture.
Brittle fracture
The primary cause of the feed screw failure was not following the proper procedure on all the welds. A small circumferential weld had not been sufficiently pre-heated and overlapping hot tear cracks spanned the 12-inch length of the weld. During straightening, the combined bending loading, hammering/impact loading and the stress concentration effects of the weld cracks caused the brittle fracture. The cracks were large enough that, had the feed screw not failed during manufacture, they may have caused failure later in service.
Looking at the region that was evaluated, the circumferential weld was the only one that had not been properly pre-heated. To reliably prevent AISI 4140 steel from cracking, all welding must be conducted according to procedure, including pre-heating and maintaining adequate interpass temperatures. Post-weld heat treatment may also be beneficial if the weld region is expected to sustain significant strain/deformation during manufacture or service.
The loading applied during straightening consisted of a sudden loading spike (impact loading). It was recommended that loading during bending/straightening of large components be applied gradually. If either manufacture or service conditions were expected to include sudden/impact loading, it was recommended a toughness requirement be included when purchasing the material.
Although not the cause of the failure, the feed screw had not been properly through-hardened during the quench and temper heat treatment. Low tensile properties may be due to the AISI 4140 steel’s metallurgical constraint. Discussion with the mill was recommended so all efforts would be made to achieve the intended mechanical properties.
Given the subtle nature of the welding issues, details of the feed screw failure would not have been obvious without the analysis. The manufacturer is now in a much better position to ensure failures are avoided.
Shane Turcott is the principal metallurgist at Steel Image in Dundas, Ont., which conducts metallurgical analysis to solve problems experienced by the manufacturing, oil, mining and energy industries.

